Complete Workflow
The Complete Workflow guides you through a DBS programming session in four steps. Data is saved automatically after each entry; you never need to press a manual “Save” button.
▶ Watch: Complete Workflow overview (video)
Step 0 — File setup
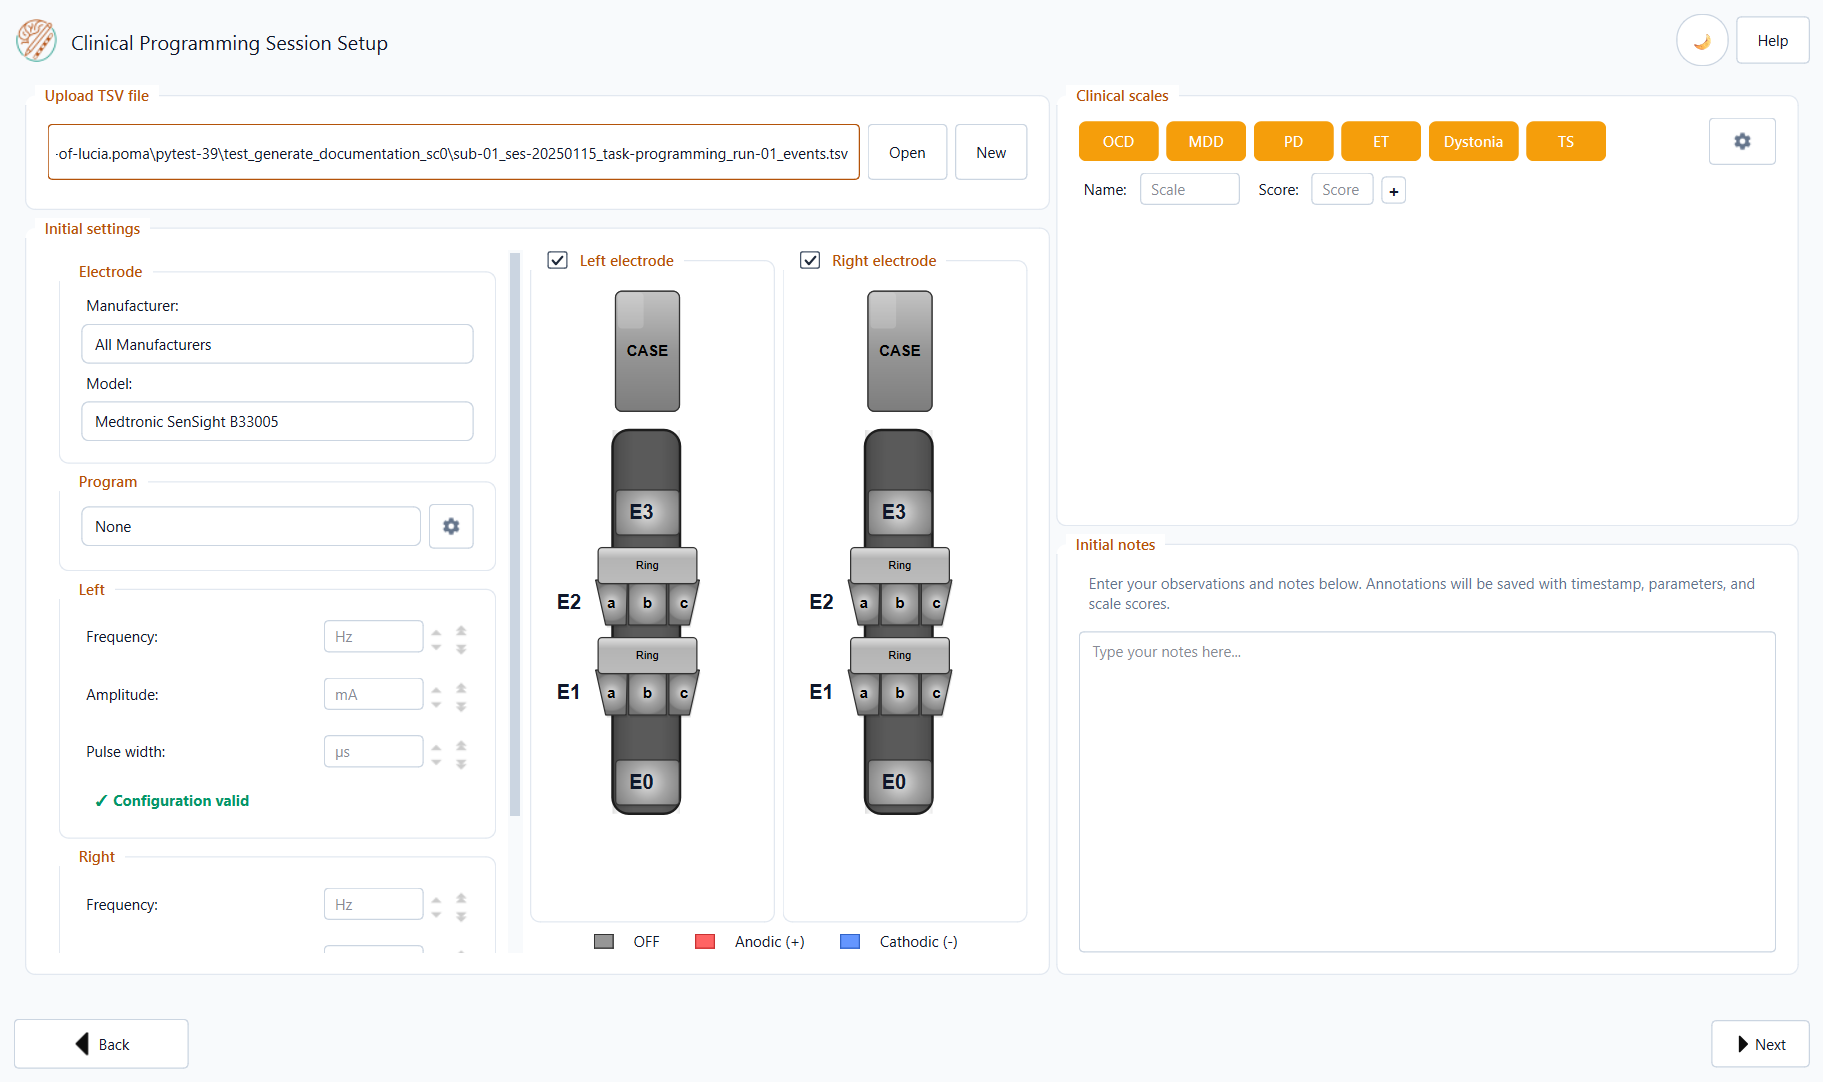
On Clinical Programming Session Setup, use Upload TSV file to choose or create the session file:
Open — load an existing programming-session
.tsv.New — enter Patient ID and Run ID in the dialog; Session ID is set automatically to today’s date (
ses-YYYYMMDD). Pick the save location in the file dialog.Drag and drop a
.tsvonto the path field.
Output filename
A new file uses this BIDS-style name:
sub-<ID>_ses-<YYYYMMDD>_task-programming_run-<NN>_events.tsv
If a file with that name already exists, you are asked whether to append to it or create a new run.
Step 1 — Initial Configuration
Electrode Model
Select the implanted electrode model from the Model dropdown. Optionally, pick a Manufacturer to narrow the list. The application supports common DBS leads from Medtronic, Abbott, Boston Scientific, and other vendors. The Step 1 screenshot above shows the interactive diagram (example: Medtronic SenSight B33005, left and right hemispheres).
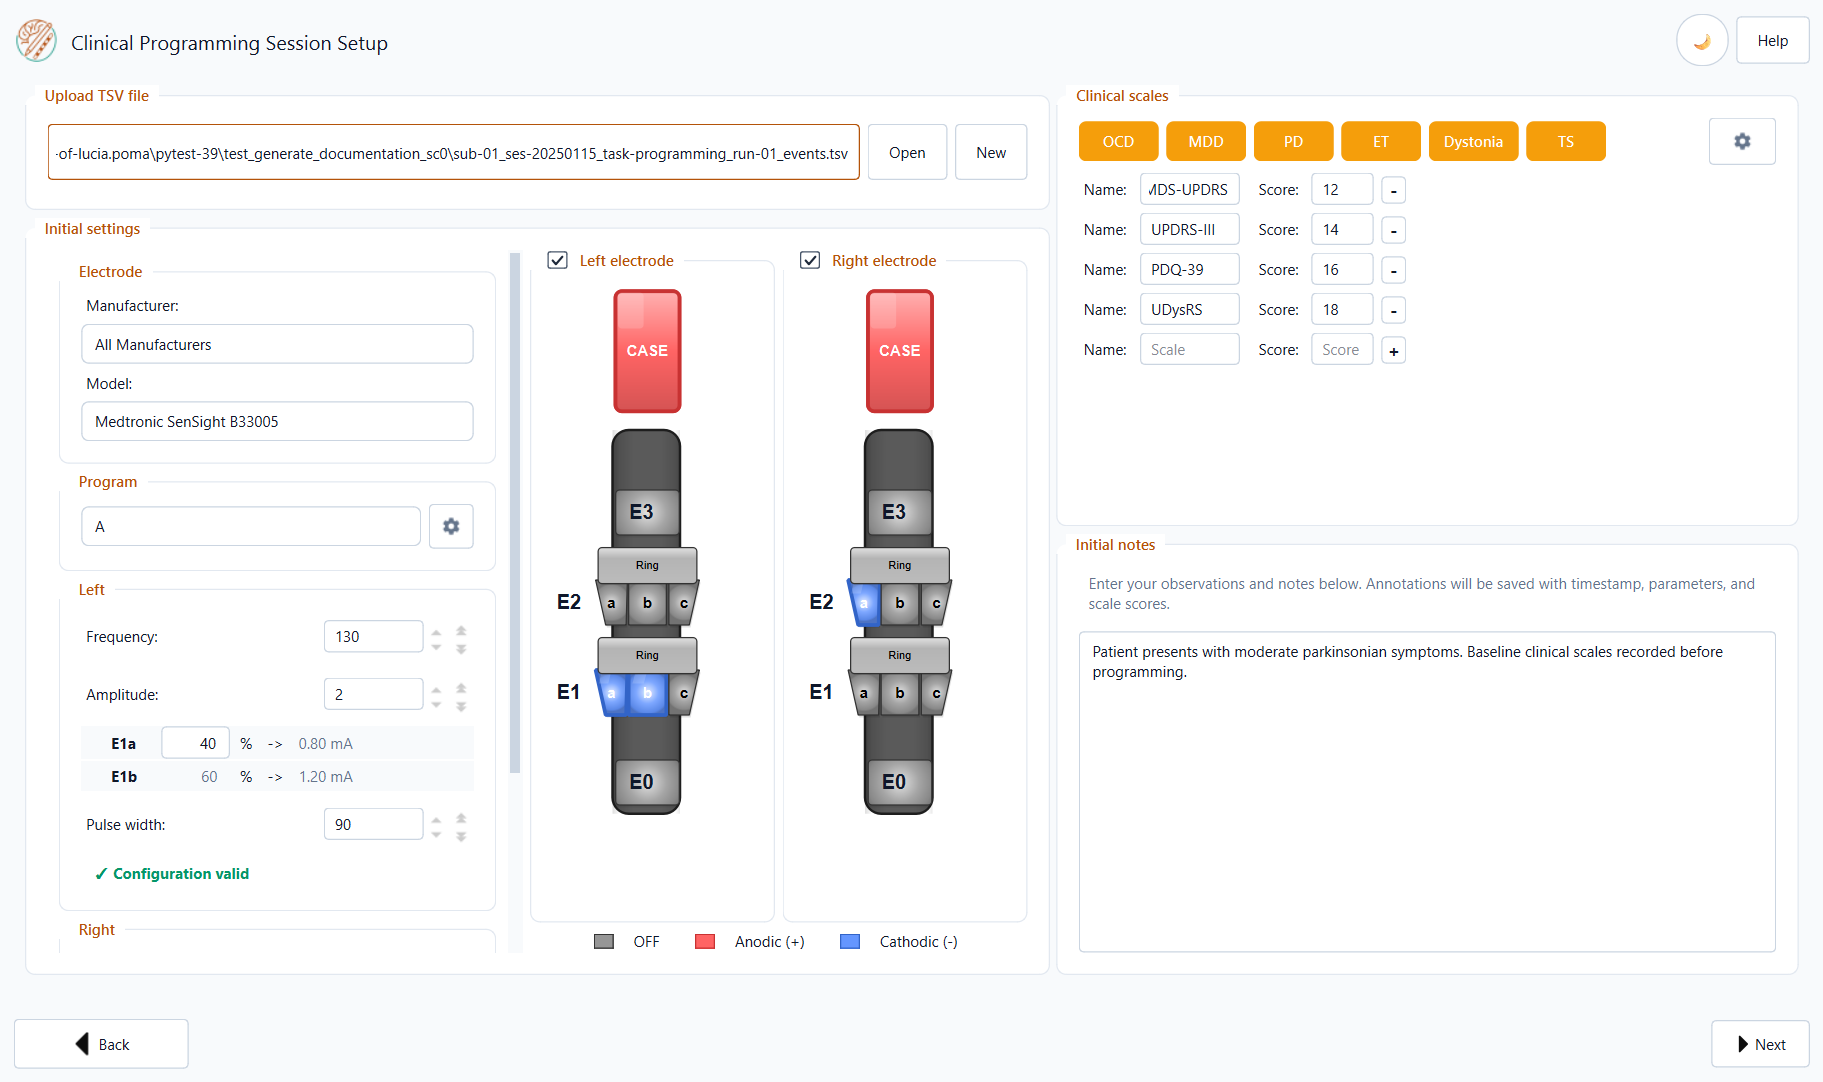
Contact Selection
Click directly on the electrode diagram to select contacts:
Cathode (−) — primary stimulating contact(s); highlighted in blue.
Anode (+) — return contact; highlighted in red.
For directional leads (e.g. Medtronic SenSight), you can select individual directional segments (A, B, C) independently for each level.
Tip
You can select multiple cathodes. The amplitude split widget below the diagram lets you distribute the total current across selected contacts by percentage.
Stimulation Parameters
Parameter |
Notes |
|---|---|
Amplitude (mA) |
Enter total amplitude. If multiple cathodes are selected, use the split widget to assign percentages. |
Frequency (Hz) |
Stimulation frequency. |
Pulse width (µs) |
Pulse width. |
Program |
Stimulation program label (e.g. A, B, C, D). |
Both the Left and Right hemispheres have independent parameter panels.
Clinical Scales
Below the stimulation parameters you will find a panel for clinical scales (validated rating instruments recorded once at the start of the session). Click a preset button (OCD, MDD, PD, ET, Dystonia, TS) to load the standard scale set for that indication, or use the settings control to customise presets.
Built-in clinical presets (Step 1):
OCD — Y-BOCS, Y-BOCS-o, Y-BOCS-c, MADRS, OCI-R
MDD — MADRS, HAM-D, BDI-II
PD — MDS-UPDRS, UPDRS-III, PDQ-39, UDysRS
ET — FTM-TRS, TETRAS
Dystonia — BFMDRS, TWSTRS
TS — YGTSS, PUTS, TS-CGI, Y-BOCS
Managing scales for this session
Under Clinical scales, only rows where you enter a numeric Score are written to the TSV when you continue. Preset scales stay visible even if you leave the score blank — they are simply omitted from the file.
Click − on a row to remove that scale from the current session list.
To add a scale for this session only, type the name and score in the empty row at the bottom, then click + to open another blank row.
Permanent preset customisation
To change the built-in preset buttons for all future sessions, click the settings control (gear icon, top right of the Clinical scales panel). The Clinical Scales Settings dialog lets you:
Select a preset from the list and edit its scale names.
Add/Update Preset — enter a Preset Name and Scales as a comma-separated list (e.g.
Y-BOCS, MADRS, HAM-D).Delete Selected to remove a preset.
Save & Close to persist your changes.

Step 2 — Session Scale Selection
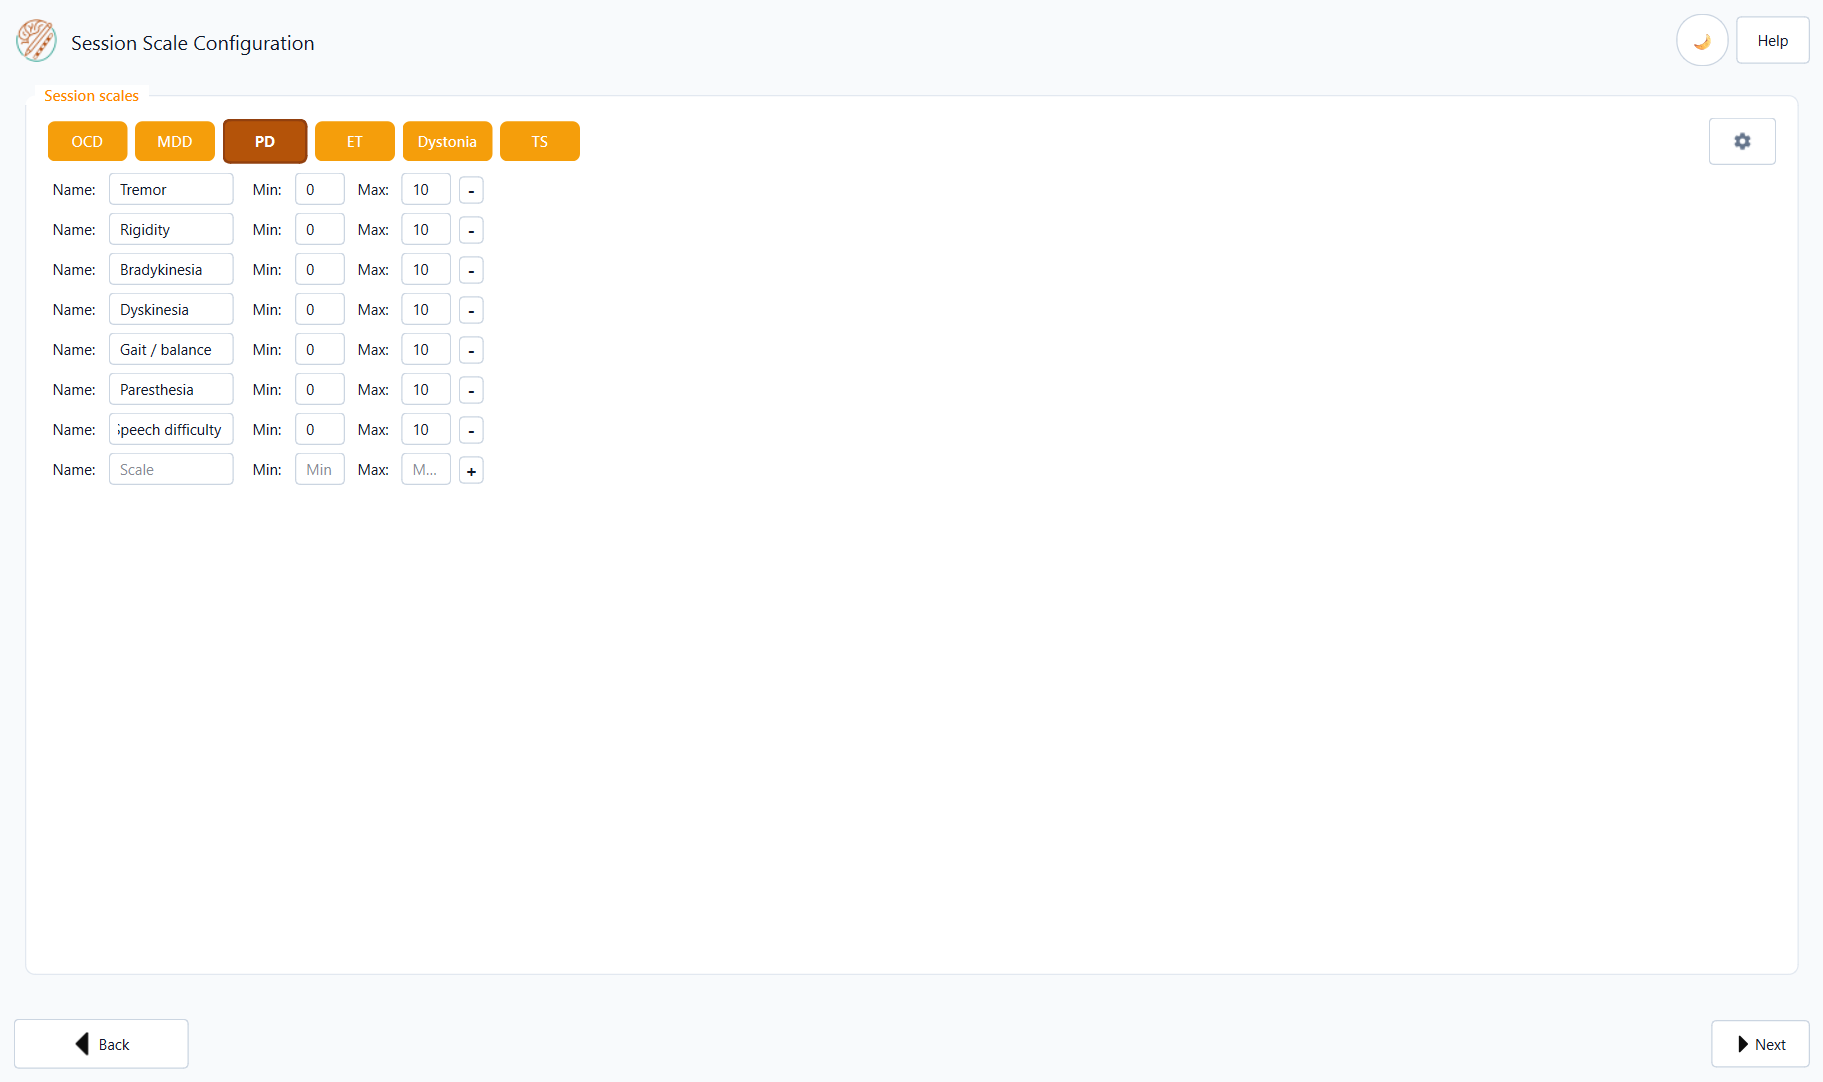
Choose which session scales to track during the session (i.e. at each stimulation configuration tested).
Built-in presets
Use the preset buttons to load a standard session scale set (rated at each stimulation configuration during programming). All built-in session scales use a 0–10 numeric range with slider controls.
OCD — Obsessions, Compulsions, Anxiety, Mood, Energy
MDD — Rumination, Anxiety, Mood, Energy
PD — Tremor, Rigidity, Bradykinesia, Dyskinesia, Gait / balance, Paresthesia, Speech difficulty
ET — Action tremor, Resting tremor, Paresthesia, Speech difficulty
Dystonia — Muscle contractions, Abnormal posture, Pain
TS — Tic severity, Premonitory urge, Control over tics, Anxiety, Impulsivity
Managing scales for this session
As on Step 1, you configure which scales appear in Step 3. Each row has a Name, Min, and Max value that define the rating range used by the sliders during recording. Built-in presets use 0 and 10 by default.
Click − to remove a scale from the current session list.
Type Name, Min, and Max in the empty row at the bottom, then click + to add another row.
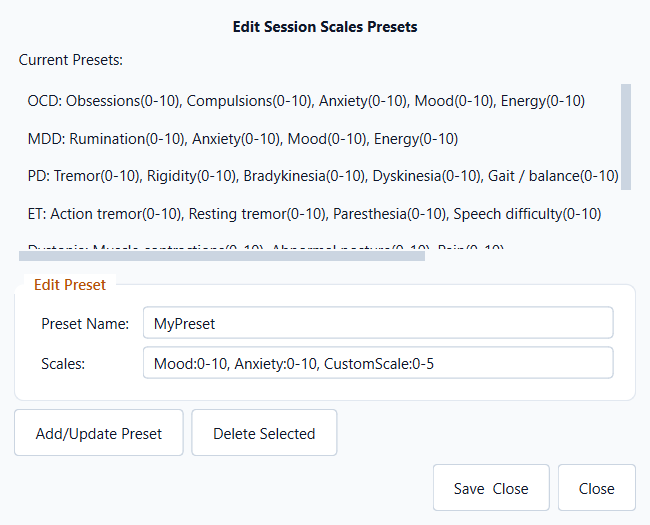
Permanent preset customisation
Click settings (top right of the Session scales panel) to open Session Scales Settings. You can delete presets, edit existing ones, or create a new preset:
Preset Name — label shown on the preset button (e.g.
MyPreset).Scales — comma-separated entries in the form
Name:min-max, for exampleMood:0-10, Anxiety:0-10, Custom:0-5.
Click Add/Update Preset to stage the entry, then Save & Close to keep your changes. (The screenshot below shows a new preset being drafted; it is not saved until you confirm.)
In Step 3, each session scale is rated with a slider (0–10 for built-in
presets). Press ✕ on a slider to mark that scale as not assessed (stored
as NaN and excluded from reports).
Step 3 — Active Recording
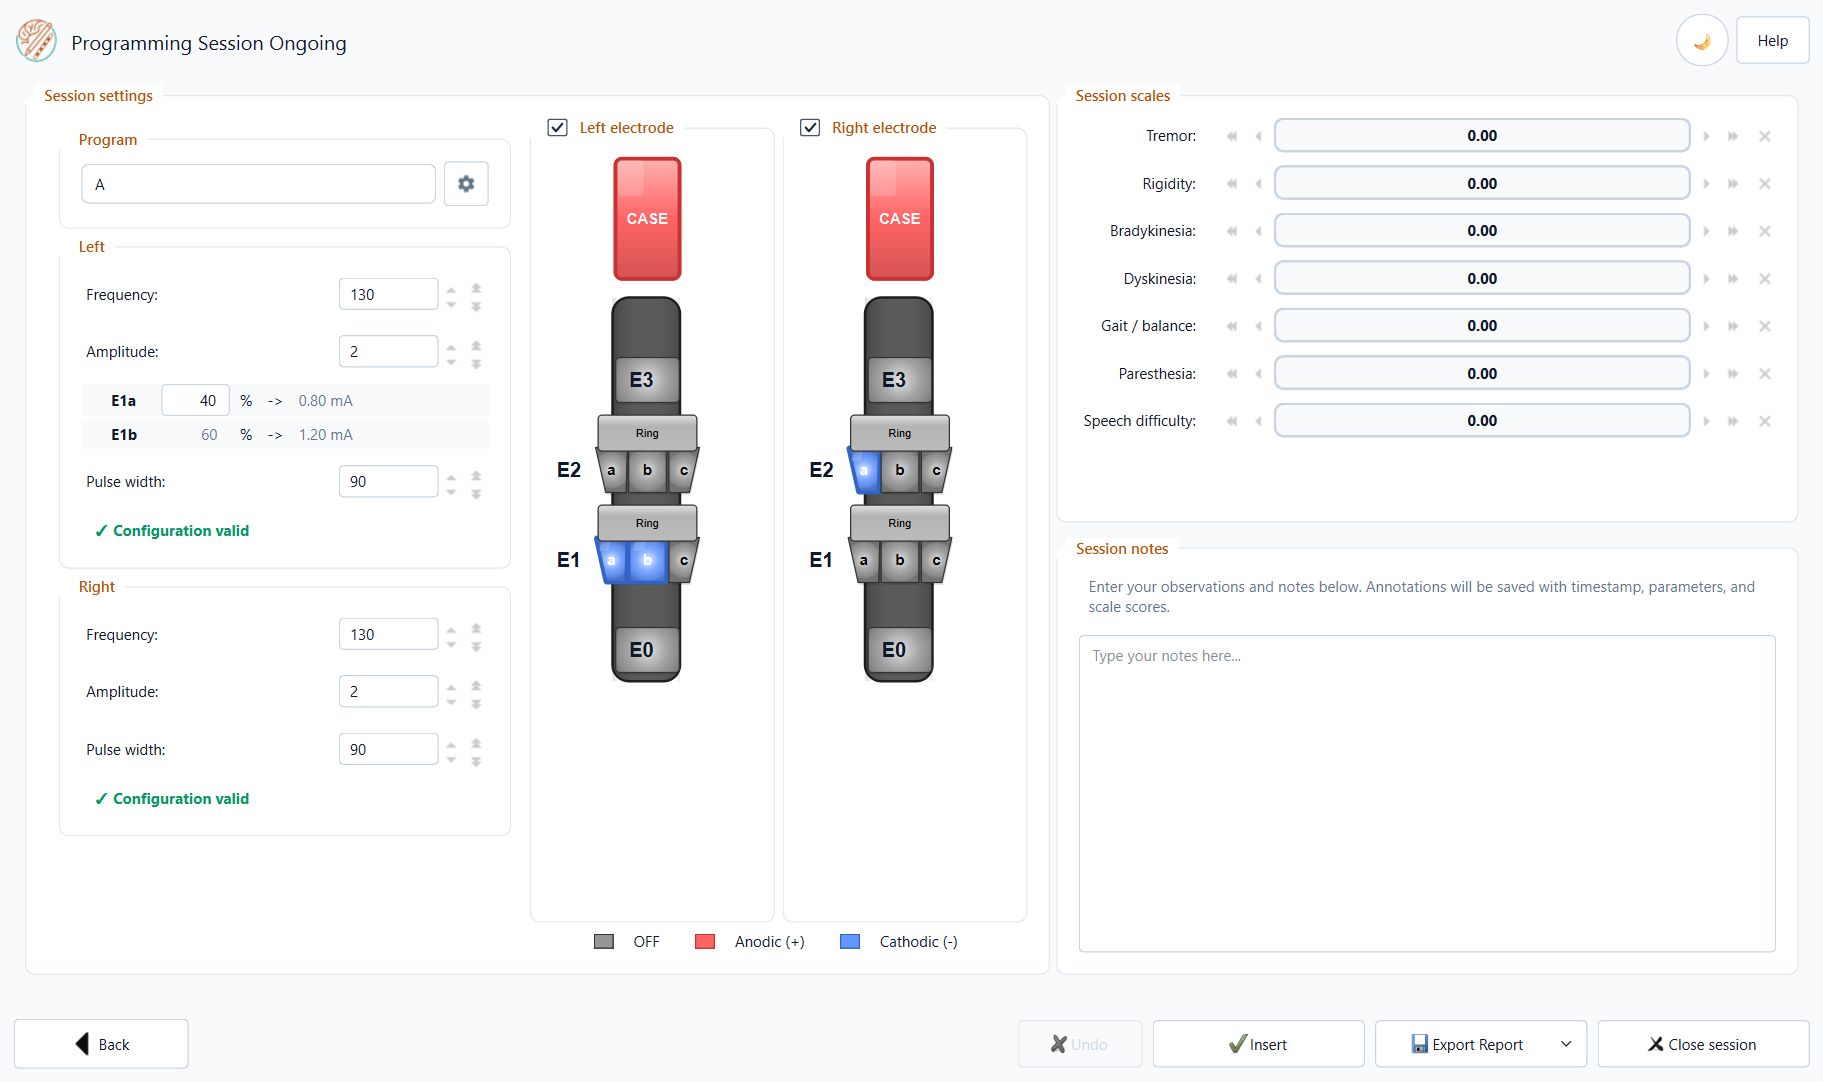
This is the main working screen during the programming session.
Adjusting Stimulation Parameters
Modify stimulation parameters the same way as in Step 1. The electrode diagram and parameter fields are fully editable.
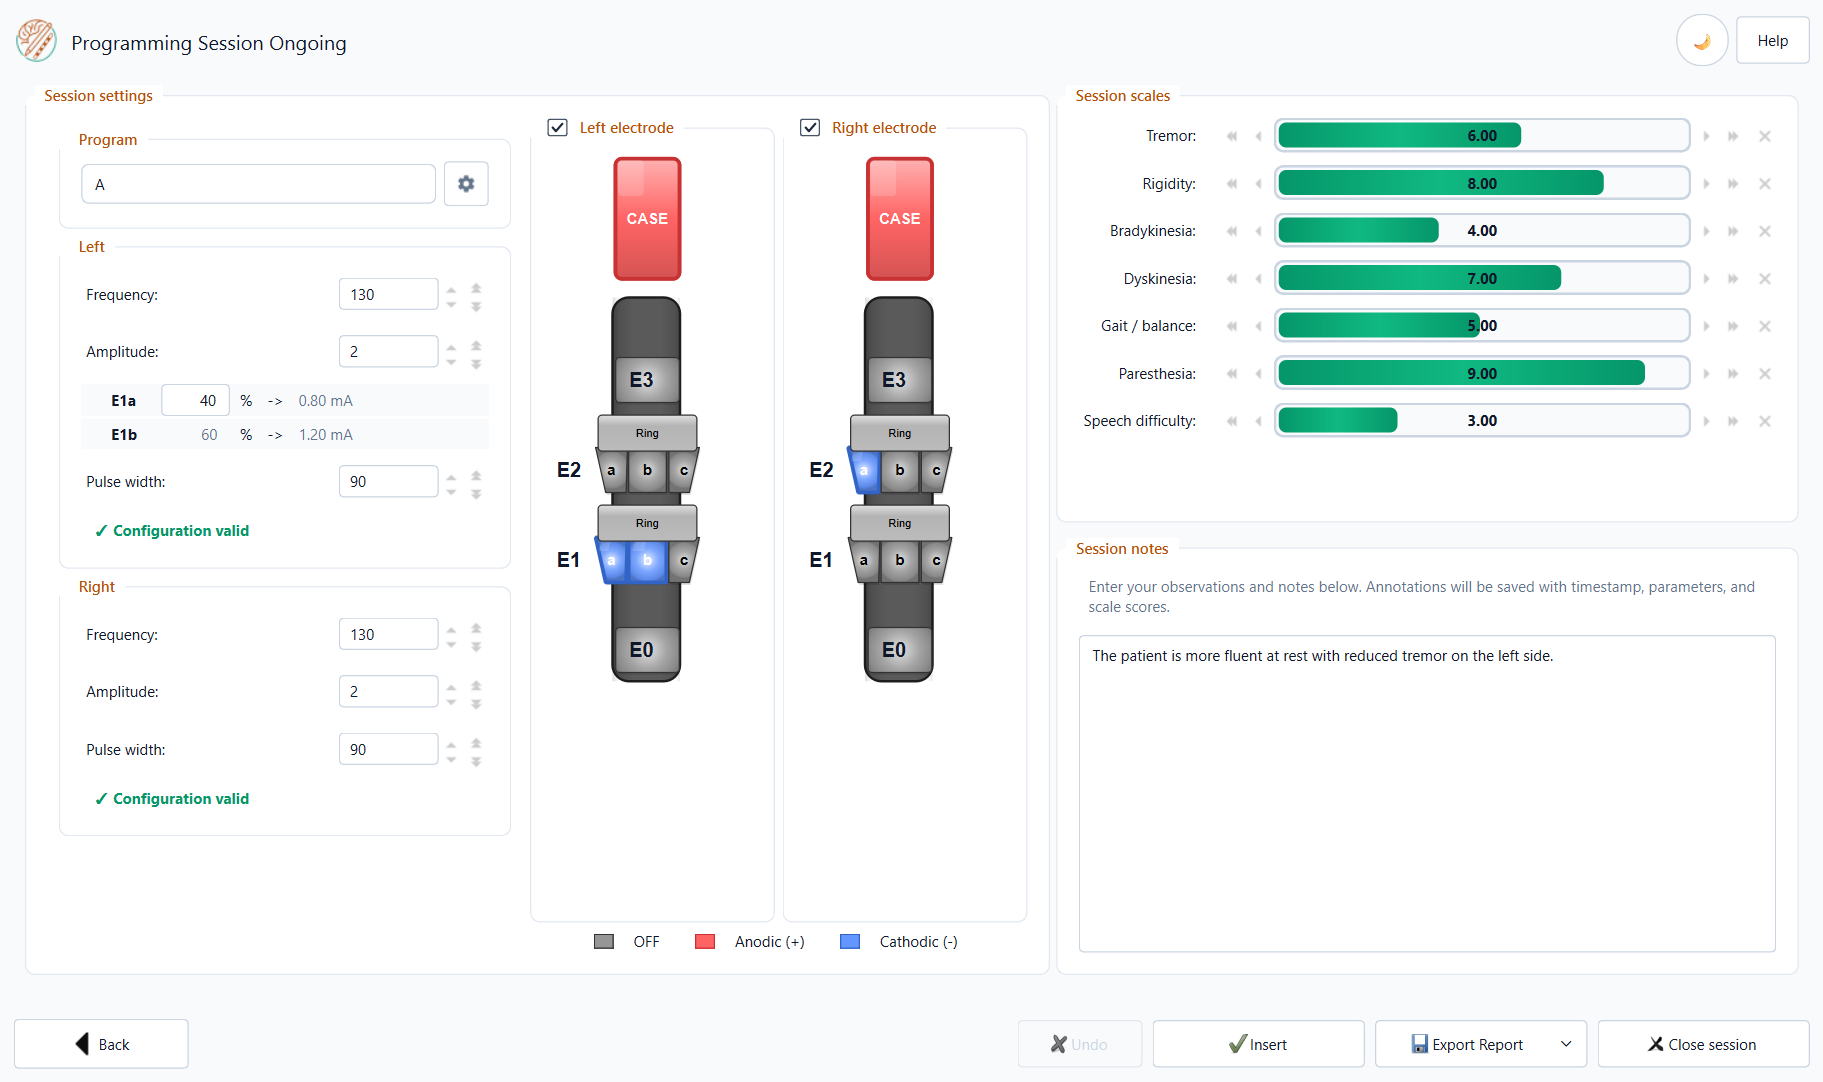
Recording an Entry
Adjust the stimulation parameters to the new configuration.
Fill in the clinical scale sliders.
Optionally add a free-text note in the Notes field.
Click Insert to record an entry.
Each recorded entry is appended as new rows in the TSV file with the current timestamp.
Session Table
All recorded entries are displayed in a live table at the bottom of the screen. The best entry (determined by scale optimisation) is highlighted in green.
Tip
You can record as many entries as needed within a session. There is no limit on the number of configurations tested.
Exporting the Report
Click Export Report → Word Report or PDF Report.
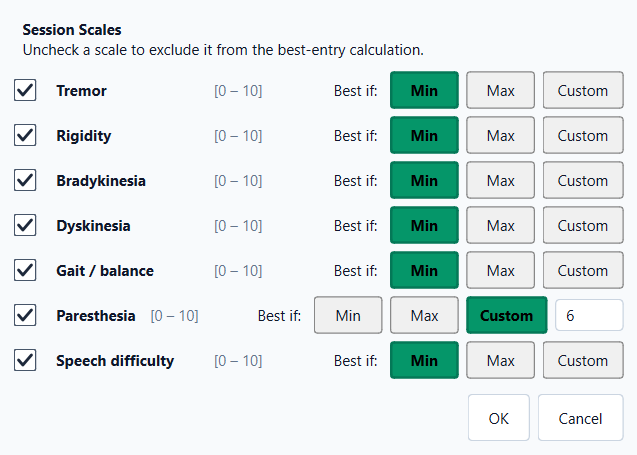
Before the file-save dialog appears, two dialogs will be shown:
Scale Optimisation — for each clinical scale, choose whether the minimum, maximum, or a custom target value defines the “best” outcome. Uncheck a scale to exclude it from the calculation.
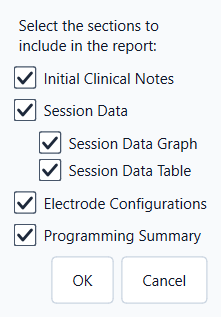
Report Sections — choose which sections to include in the report. By default all main sections are checked. Under Session Data you can include the timeline chart, the lateral data table, or both:
Initial Clinical Notes — clinical scale scores and initial notes
Session Data — parent section; expand to choose:
Session Data Graph — timeline chart of session-scale values across recorded configurations (best entry highlighted per scale)
Session Data Table — lateral table (L/R rows) with stimulation parameters, scale values, and notes
Electrode Configurations — initial vs final contact diagrams
Programming Summary — session duration and parameter ranges
Choose the save location for the report file.
Report Contents
The generated report includes (depending on the selected sections):
Initial Clinical Notes — baseline clinical scale scores and initial notes from Step 1.
Session Data — optional timeline chart (one line per session scale, x-axis =
block_ID) and/or data table of all recorded entries with stimulation parameters, scale values, and notes. The best entry per scale is highlighted in green according to your optimisation choices.Electrode Configurations — visual diagrams showing the initial and final electrode contact selection (Left and Right hemispheres).
Programming Summary — session duration, number of configurations tested, and parameter ranges per hemisphere.
Closing the Session
Click Close session when the programming session is finished. The TSV file is finalised and the application returns to the home screen.
Warning
Do not delete or rename the .tsv file while the application is open.
Always close the session first.